Wednesday, April 25, 2012

I'm baaaccckkkkk....


So, do you know that if your router goes down and you are administating a hybrid lan/wlan with 7 computers, 2 network printers and an enormous number of wireless devices, it can take 7 to 10 days of concentrated work to make everything stable again? That's what happened to me. I replaced the dead router with the latest and greatest and then decended into "network hell" where everything would be working at 7 p.m. in the evening and by 7 a.m. it was in shambles. After 7 days, I actually found the destabilizing agent, and then another couple of days to reassemble the system, all complicated by the necessity to do any disruptive procedures during noon hours and after business hours, while trying to also target the hours when a post-menopausal, busy woman still has working brain cells. After that, my mother had many appointments, requiring a driver/assistant, the grass began to grow (a month early, I would point out) and needed 6 hours of mower attention each week, and both of my daughters are trying to "give birth" to master's thesi (sp?), one at the "labor" stage and one in the "morning sickness" stage. I like to help, if I can, in any way I can, even if just by listening on the phone. Normal work and housework, and when I lifted my head, an entire month had gone by. Whoa. Slow down, life. But, during this whole period, I found time to craft, my sanity-saver.So, I worked on some new cards, and finished some that had me stumped.


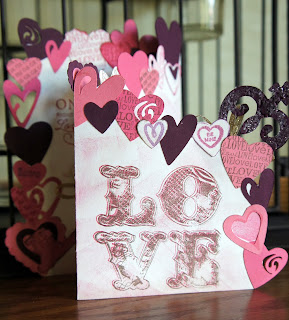
A few months ago, as I was "Pinteresting", I found this blog ( craftysahmiam.blogspot.com ), and this great card. I was saying "Wow, wow, wow, I MUST do this". 


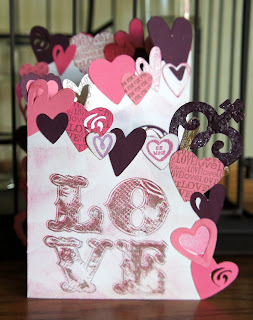
So I started. The angle cut and zig-zag fold were pretty easy, and the punched hearts were just time consuming but not difficult. It was the "what do I do now" portions that followed, that made this "Valentine" remain unfinished. So, I threw the kitchen sink at this card. I stamped, and double stamped.


I adhered matching hearts on both sides, so that the heart border was the same regardless of how the card was viewed. I decorated 5 of the 6 possible surfaces. I also inked all 6 surfaces with a random pattern.


I die-cut with with a Memorybox die,
And, I hand cut the heart with a key hole.


I cut the keys with a Sizzix die. I embossed one key and background stamped the other. They both got ribbon.


So, do I like this card? I don't know...I think there are some nice parts, some nice techniques, but, there are places where I wish that I had done some things differently. In particular, There was a great wood mounted, rubber stamp sentiment that I love (the once-in-a-while stamp), I like the location and ink, but because exact placement is difficult with wooden stamps, it is about 1/8 inch from the best location. Does it matter?  In this case, yes, it does. The misplacement put the sentiment right up against the fold. One of the things that this card taght me, was that I will be planning on unmounting my wood-mount stamps and using them with acrylic blocks for more accurate placement.
 Still learning...


Monday, March 19, 2012

Junk Paper!!!

So, a quick one today. I have spent the last 2 1/2 days trying to configure our new router and various devices in hopes of maintaining an internet coneection for longer than 3 minutes. No luck yet...and it's Monday, the day to pay bills, order inventory, write paychecks, make bank deposits, but while sitting at lunch today, with the lovely ladies from the office, the Stampin Up owl punch that I ordered came to me via UPS.  We opened it and my husband, just messing around, started punching the owls from junk mail laying on the table. The ladies from the office started stacking the pieces and assembling these cute little junk paper owls. I ran to get glue and inspiration struck me (over the head, mostly). After lunch, and after another couple of hours of desk work, I sat down and punched a few more junk paper owls, assembled them and ran to my table of craft "crack" ie. supplies for those not hooked yet. The result was this little card.


The angle (and the "artistic" smudging over the top of the test, which actually looks really good on the card...but you can't tell it here) makes it hard to read the outside sentiment - one of these things is not like the others ...- the inside sentiment- one of these things just doesn't belong... (I was channeling Seseme Street today)


Aren't the junk paper owls cute?


The inside is also pretty cute. See the blue owl's little owl face expression in the photo below, he is shocked.. and the others are too. See how they have moved away?


What fun it was to make this card. It was a spot of sunshine on a day pouring rain. Did I learn anything? You bet. Inspiration can strike under the most banal circumstances, junk paper can make an excellent craft supply, and television has sunk deeply into my subconscious, maybe too deeply! Oh, yeah, I know the beak was assembled upside down, but once started, best continued in the same way.

Wednesday, March 14, 2012

Variations on a theme...

You can expect to see a few cards made with the Spellbinders Cut, Tuck and Fold dies in the upcoming days. I am just facinated by them. The card below is what I think of as a suitable color palatte for anybody and multiple occations ... and I look forward to completing the inside when it is needed. I am not certain how the colors will translate to the web, but the card base is black, to which I have adhered a peacock front, a black mat, a yellow mat and the folded medallion. Along the bottom of the black and peacock mats, I use a MS edger/embosser combo. I also slid a strip of the yellow cardstock under the lower edge of the peacock mat so that it shows through and it livens it up a little.


This medallion technique is the "cat's pajamas" and what I learned today is to use a unbent paper clip and the cricut spatula to carefully remove the cardstock or paper from the die. The die cuts well, but it is a real "bear" to remove without tearing. I also learned to sloooow dooown and enjoy the trip, ie. the entire card making experience.

Tuesday, March 13, 2012

Some days things just work out...

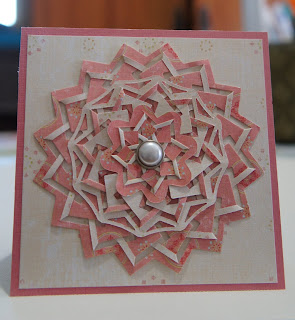
Today I was playing with some cool new cutting dies from Spellbinders. They arrived hot off of the press (or forge or whatever), anyway, the box was smoking when I opened it yesterday. These are the Cut, Fold & Tuck dies and they are soooooo neat.


There are several different designs and each package contains 3 graduated sizes. The one pictured is called "Spectacular Spin". These are very reminiscent of the "Lysee" or "Geo-Dies". I have been eyeing this type of die for 2 years after seeing a picture of the technique in a card-making book. I will say that the Spellbinders iteration is really economical in comparison to the other dies of this type. If you want to use dies like these and techniques like this, remember to look for double sided paper and when you find it, write the company and thank them. It is getting harder and harder to find, as companies are eliminating it as a cost-cutting measure. This is from a K & Co. paper pad called "McKenna".


But....what really worked out is that, while assembling this card, I had a dear friend call and in the course of conversation mention that today is her birthday. Yayy, now I knew how I wanted to finish this 4" by 4" card.


So, what did I learn today? I learned that some days, it just all works... techniques, colors and a special occasion. Happy Birthday, Jeanne.


Monday, March 12, 2012

In & Out of the Corner...

I have crafted myself into a corner again... and out and back in, and hopefully, out again. I am still contemplating easel cards and Que Sera/Cricut Flower Shoppe paper flowers. (I have made a lot of flowers. I am going to have to put some away).


Here we have an easel card base. The little orange tabs were the product of a desire not to have the ubiquitous brad or button on the bottom of the card that supports the back. However, as I looked at the card, the orange tabs looked more and more ugly. I couldn't think of a small embellishment that would work with the location, the size and the theme. (Now I am in a design corner) SO.... I punched a fence to attach to the tabs for the back of the card to brace against.


I liked the fence (out of the design corner for a minute), but the dark green wasn't doing much for the look of the card. I punched another border in vanilla card, added just a little TH distress ink and layered it over the dark green fence. Then I threaded a diecut vine through the fence here and there. Now I liked the fence brace and it laid flat under the card body when folded (or will the next time I make this type of card). The photo below shows the front of the card and what it would look like when folded (if it would).


It needs some Stickles in a couple of places, around the green button (to hide the hot glue leakage) and on the green vine on the fence (just to bling it up a little). I am still undecided about the treatment on the base of the card (back into the design corner) ...a mat, as in the photo below ... OR


...tied twine, like this photo. I'm leaning toward the twine (out of the corner?). Oh, and I need a butterfly or three on the top and some distress ink sponged on the edge of the orange base.


So, here we have an unfinished card, but it's close to done. I did this project because I wanted to find a different aparatus to brace the back of an easel card and, boy, did I learn some things. I learned that it is a lot better to have an idea of the steps I want to follow before I start (I'm pretty old, ok...upper middle aged; shouldn't I have figured this out before? ...well, truth be told, I have in most areas of my life, just not on fly-by-the-seat-of-my-pants paper projects). I want to make this card again. I will think of this one as a template. I learned that when you add an element that folds back flat (like the fence), knowing what the element measures and making certain that the scoring/folding is extremely accurate is of utmost importance. "Almost" doesn't work out well on this project. The fence element is about 1/32 inch taller than it should have been, and the back fold is the littlest bit off of 90 degrees with the edge so the card binds in the back fold just a little bit (but not terribly). This card is truly a learning process and I am the lucky holder of a "Learners Permit".


Thursday, March 8, 2012

My first easel card...

Here it comes...my first easel card, the finished version. But, first the journey to the finish.


So, I started with these cute paper flowers, cut from K & Co. Que Sera paper and the Cricut Flower Shoppe cartridge. Then, I folded the easel card from kraft card stock and layered more Ques Sera paper on the bottom platform portion and a nice deep navy card for the upright. The green vine is cut with one of my favorite dies, Memory Box Madera Corner (I cut 2 and pieced here and there to fill out the background a little).


Now, what to add?


I punched so many butterflies trying to find a base and layer that complemented the flowers. I ended up with a light green patterned base and a layer cut from a gold shimmer paper.


I have a cute dragonfly brad and a GIANT patterned area and no ideas. I liked the upright, but needed something to balance the colors and weight of the large-ish flowers (and hide some of that patterned paper, just a little).


Out came the Cuttlebug and a Nestabilities die. Distressed, stamped, antiqued and generally messed with a while, just to find something the right size and color.


So here I am last night, pretty sure that this card was finished...


and here I am this morning at 6 AM, absolutely certain that I do not like that little stamped card piece, not even one little bit. I thought maybe some more green vines, some ribbon, some charms...but, what made me happy was this Making Memories Charmed Quotes metal plaque. I felt it had the right size, an inobtrusive color and a good weight.


This is it...my first easel card, finished (for my friend's birthday). 

So, what did I learn? When it is all said and done, if I want to use flowers of this size again, I think a 6 inch card, rather than 4 inch, will look better balanced. I also learned that I love patterned paper a little too much, and should limit the amount that I use on a project.The last thing I learned is the most important lesson...until it is adhered (and even after, if you have some fishing line to do the removal) it is never to late to rethink the elements. Go dig in the stash!


Wednesday, March 7, 2012

One word....

One word today... Stickles. Very few things in life cannot be improved with the application of Stickles or ice cream (different modes of application, of course).

Yayy, Stickles!


Good enough little flower.


After the application of Stickles, a highly improved little flower. Yayy, Stickles!

So, what did I learn? Earlier, right before Christmas, when I was making a really detailed step card, I learned that Stickles take a long time to dry. What I learned on my little flower here, was to remember what I learned last time I used Stickles (rather philosophical, no?).

Tuesday, March 6, 2012

Flowers, flowers and more flowers...

So today I want to post photos of the three types of paper flowers I made last week. As you can see, I loooove the patterned paper from the K & Co. Sera, Sera designer paper pad. It is so versatile, color-wise.


These are the Flower Shoppe Cricut-cut flowers. Easy, easy, easy...with lots of variations in cuts, components and styles, not to mention size options. If you have a Cricut already (I did, I am so lucky) the price of this cartridge will give you LOTS of pleasure. It is right now, because I am on a flower kick, my favorite cartridge. (Could, probably will, change next week as a new enthusiasm kicks in, but I think this cartridge has real staying power as something that I will use over and over.)


These two are circle punch flowers. I can't remember where I saw the card that was using these as components, but they were quick to make. Not quite as simple as they look, because to look good you will want to fold the same size arc toward the center, meeting at the bottom, on each of the six circles, and the angle created by the 2 folds need to be exactly 60 degrees (yes, I am a stats/math/tech nerd).


And this one is the joined petal punch flower (only one because it was such a "pib" to punch). I don't plan to publish the names of products that do not work for me, because, hey, it could be operator error, not a product issue. But, I will tell you just exactly in what way it didn't work for me. As I mentioned in the last post, this punch jams about 17% of the time (nerd alert) which is enough to make it very hard to get a 12 inch strip. For a good looking flower with this size of petal, I like to have two 12 inch strips. By the way, this one has one 12 inch strip and two 4 inch strips, hmmm?

So, what did I learn? Simple is not always easy (but at least it is do-able), and you cannot predict the way a tool will work for you, based on the company or visual appeal (and sometimes you just cannot make that do-able...as in life is too short, way too short). And the fill light adjustment helps when I photo something in my favorite location and light (morning, I am a lark). Still working on the color adjustments, though (smile).


Monday, March 5, 2012

Maybe some of you will recognize this...

Maybe some of you will recognize this...this morning I had about 5 different topics in mind, about which I could have written pages (yes, PAGES), but by mid-afternoon, after spending 7 hours doing actual business work...nothing is left except these 3 photos. Let's see what they suggest.


Okay, obviously I work on multiple projects at once, my tools are everywhere, and I have great light on my larger work table. Honestly, this is IT...the way I "create". I will start something in the kitchen for dinner and walk in to my office to look at whatever is laying on my table. I will read about a technique or see a pin on Pinterest and run in to lay paper out or accumulate the supplies so that I can try something new. It's an interesting 24/7 process, sometimes I even dream about an idea. See the paper flowers on the table? Those are my first attempts at paper flowers. They turned out ok, but I have crafted myself into a corner by using some really great patterned paper to make them (K & Co. Sera, Sera DP) and now have to come up with either a pattern that doesn't overwhelm them or use plain card. Well, actually, I think I will use Coordinations, an embossing folder, and some sandpaper for the background. We' ll see how that looks a little later in the week. I suspect that if I had made them with plain card and used some TH Distress ink on the edges, I then would have used the patterned paper as a background. HMMM...I just need to remember that in the overall scheme of things, paper is pretty inexpensive.


Notice the Cricut Gypsy ... I have one of the paper punches that will punch a strip of connected petals and I have the Cricut Flower Shoppe cartridge. The paper punch jammed every fifth or sixth repetition and frustrated me beyond belief. I wanted to love it because, despite what the photos look like, I am a minimalist. I like to use items that do not require power, noise and are simple. In this case, though, the Cricut-cut floral elements are crazy good; pure pleasure to cut and assemble. One of my daughters will be gifted with the punch. Maybe young muscles will be more effective at making it work without jamming.


And finally, in the center of this photo is a transparency, stamped on the rough and smooth side with staz-on, and copic colored on either side that is opposite the stamp. I want to make a stained glass card element. What did I learn from this? Staz-on is pretty wonderful, stamps on almost anything, dries quickly, copic will take Staz-on right off, dry or not, if you color on the same side and when coloring with copics on transparencies, I found that blending will be ineffective (thanks many wonderful bloggers who mentioned this when I googled it AFTER I tried to do it; I might want to look at moving the research step WAY up on the project list) and (this is mine) using a color that is not in the same close color family and dotting it in some areas will confuse the eyes. Now, your brain will not expect smooth even color (like cellophane) and you have disguised the darker areas that result anytime you overlap the base color even a little (it looks a lot like a distracting ripple or wrinkle). I will post a close-up of this technique later in the week, when I can show the bad and, hopefully, the better, or even the good. Oh, Yeah, one more thing I learned was that I will not be posting any more photos taken with that much sunshine.

Sunday, March 4, 2012

1200 characters is not enough!

I'm an adult...even an older adult...married to a man I still love after 38 years (and yes, that IS a long time), mother of 4 grown children (with whom I now have wonderful adult conversations...lucky, I know) who found herself with an empty nest, a business that I have finally routine-ized (so I don't have to think/agonize over so many details, I just know how and what to do and when to do it, a parent who needs, make that NEEDS, me and a whole bunch of pets. This added up to a clown car of happiness AND stress traveling down my life's highway. I discovered a hobby that let me indulge in a love of color, art and office supplies, you-tube, and how-to books...paper-crafting. I find myself laying paper palettes on tables, arranging and rearranging, shuffling, cutting, folding; well, you get the picture...envisioning, concentrating, THINKING. However, my creations don't always turn up on the "perfection" end of the scale the first time I make them, or the fifth time, or, sometimes, ever. I am hoping that you will want to come along with me on my paper-crafting journey, the good, the bad, and the inspired (occasionally) because I plan to show it all (mistakes, failures, fixes, methods). That's what a learners permit is all about. ( and now I have the hokey pokey song stuck in my head)